Note: This is a classic reprint from NEWS #009.
After approximately 1840 the design and construction of windows was virtually standardised. This discussion concentrates on sashes, that is the glazed frames. A future article will discuss sashes made before 1840.
|
Basically there are two categories of window sashes, casement and double hung. The members of sashes are known as:
- Stiles: vertical member morticed for rails and glazing bar.
- Bottom Rail: bottom member of casement sash or bottom member of bottom double hung sash, tenoned into stiles and morticed for glazing bars.
- Top Rail: top member of casement sash, tenoned into stiles and morticed for glazing bars.
- Meeting Rails: in double hung sashes. Top rail of bottom sash, bottom rail of top sash. Meeting rails are not moulded and close against each other to form a weather seal;
- Glazing Bars: Rebated and moulded members contained within stiles and rails.
The joints used in sashes are known as:
- Mortice and Tenon: always through wedged. Rails are not launched but rather,
- Franked: section of tenon cut back to contain spur formed on stile.
- Open Mortice and Tenon: used for meeting rails, always pegged.
- Open Dovetail: Used for meeting rails in quality work.
- Rebates: Glass panes are puttied into rectangular profiles known as rebates. (Scots: Check or rabbit),
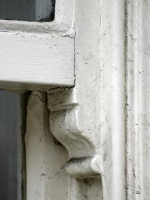
In early sashes stiles were flush with meeting rails. Later, stile of top sash continued below meeting rail. Finally in common work stiles-of top and bottom sashes continued beyond meeting rails: These projections were known as Joggles or Horns. Such horns were moulded.
Sizes: Early sashes can be a bare 1C" in thickness. After 1840 sashes were a minimum thickness of 1³⁄₈". Thickness rose by increments of approximately ¼" up to 2" plus according to size of window opening. Widths of members were a minimum as follows:
- Stiles: 2¼" or 2³⁄₈"
- Rails: bottom 3½", top 2c"
- Meeting rails: early ⁷⁄₈", later 1¼" plus
- Bars,: early ⁷⁄₈", later 1³⁄₈" plus
Moulding profiles were standardised. The two common profiles were Sash Ovals and Sash Lamb's Tongue. Sizes are known by the following terms:
- Sticks on: the distance the moulding projects across the face
- Sticks down: the distance the moulding projects into the edge
The stick down size must coincide with the depth of the rebate. The stick on size plus the rebate width minus the thickness of the member equals the mortice size. It is therefore obvious that a relationship between moulding size, component size and joint size exists.
The table reproduced from an old tool catalogue makes this clear.
Setting out sashes
|
All joiner's work is set out from sectional full size drawings. A vertical cutting plane provides a section through the height, a horizontal cutting plane provides a section through the width. Thus two sections can provide all information necessary to set out simple framing. These sectional drawings are made on narrow boards known as Rods or Skids. For sashes two Rods are needed, The Height Rod and The Width Rod. The Rods should contain details of the "Cases" to establish size of meeting rails, splay on bottom rail etc.
The 'sticks on' and 'sticks down' sizes must be accurately drawn, preferably from sections of the moulding or by templates. Note also in sashes the "sight" line does not coincide with the "shoulder" line. Profiles of Horns and sill should also be set out from templates.
Sash making tools
- Sash Mortice Chisel: light mortice chisel used to chop mortices in sashes
- Sash Saw:large tenon saw with teeth about 10 TPI, cross filed to rip. Used to rip tenon cheeks.
- Tenon Saw: used to cut tenon shoulders.
- Scribing Gauge: in channel gauge used to scribe mouldings.
- Sash Scribing Plane: used to scribe mouldings, earlier technique.
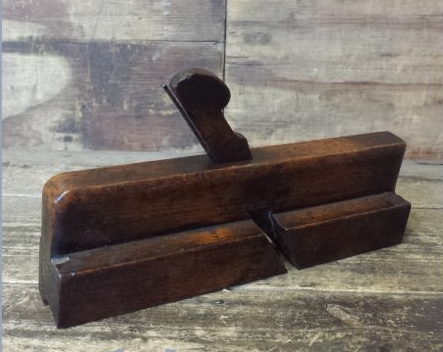
- Sash Planes: used to stick mouldings. Made in pairs; No.1 removes bulk, No.2 gives final profile. N.B. Mouldings must be left sharp from plane if scribing is to be clean.
- Sash Fillister: Plane used to stick rebates.
- Templates
- Mitre – to guide chisel to cut mitre before scribing.
- Scribing – used with gauge (scribing). Made to match planes.
- Alternative Tools:
- Stick and Rebate Planes – plane moulding and rebate simultaneously.
- Auxiliary Tools:
- Sash Routers – made to match sash planes to stick mouldings and rebates. Right and Left for curved sashes.
- Sticking Board – board to hold bars for planing rebates & mouldings.
Preparing Components
Sash members are planed to size free of wind. Face sides and edges are distinguished by pencil marks.
Setting Out
Components are set out from the Rods. Mortice and tenons are gauged with the mortice gauge set to the sash chisel. Shoulders are cut with the stribing knife. Stick on and stick down lines are lightly gauged.
Joint Cutting
Tenon cheeks are ripped with the Sash Saw and mortices chopped. Rebates are planed with the sash fillister. Mouldings are planed with the Sash Planes. Shoulders are sawn. Frankings are cut. Finally rails and bars are scribed.
Assembly
Sashes are wedged up and cleared off. Before modern adhesives lead paint was used to assemble the joints.