Note: This is a classic reprint of a series of articles from 1995. Originally published as three articles in NEWS #023 (June 1995), NEWS #024 (August 1995) and NEWS #026 (December 1995). The third article hinted at an upcoming fourth article, but that was never published.
The French Polishing Trade
So people will not be confused, there are two processes using the material known as french polish. One, commonly used today, is a process of applying the material with a brush. This is shellacking. This article is not about this process. The other process will be explained as this article unfolds.
A little of the history. French polishing is a process of wood finishing which should result in a highly glossy and smooth surface being imparted to furniture and decorative woodwork. As the french polisher is the last person in the production line to handle an article being made, on his skill and judgement depends much of the ultimate appeal.
Early in the 18th century a finishing process, involving the application of shellac in alcohol with the aid of a pad or "rubber" was introduced. Rightly or wrongly, the French are credited with its introduction. Hence its name.
During the 19th century and early 20th century industrial chemists were not available to guide the trade in the preparation of the materials necessary to achieve the perfect result, so by trial and error a procedure evolved, not always applied in the same way by each tradesman, who relied on their own skills and experience in developing their procedures.
About 1920 the nitrocellulose lacquers were developed. These were expected to render french polish redundant. History tells us that this has not happened. While it is accepted that the synthetic finishes have a dominant place in the furniture industry it can not be said that french polish has had its day. It is still regarded by many as the best finish for fine furniture.
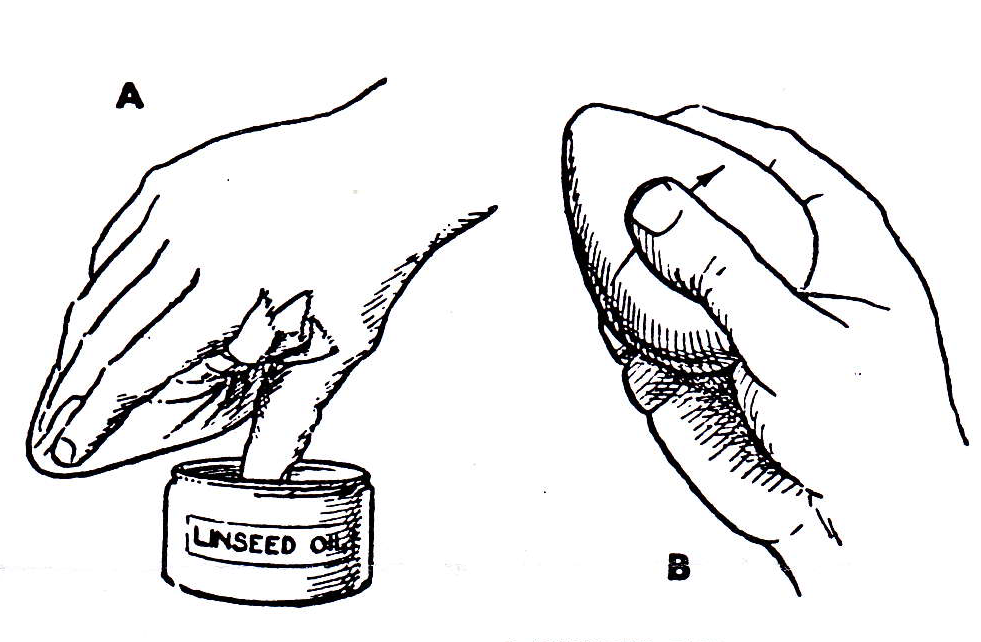
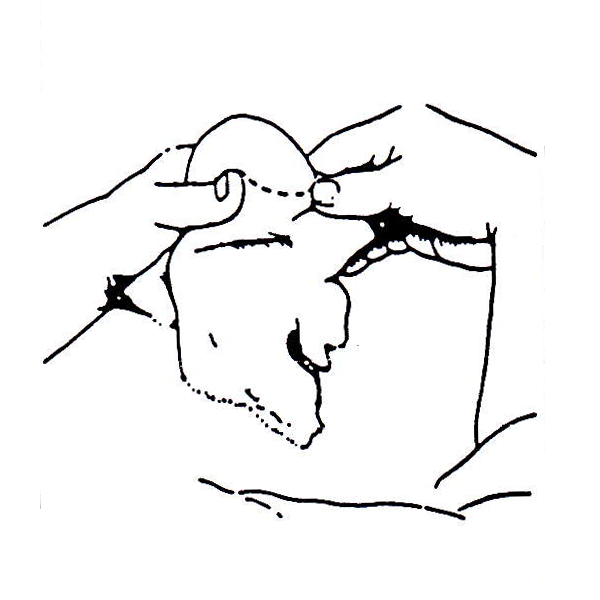
 Fig 1: Position of work when polishing By facing the light the progress of the work is clear. The path of the rubber can be seen, and any blemishes are at once obvious. |
Shellac, what is it? Shellac is derived from a hard resin called lac, which is produced by a tiny scale insect infesting certain trees of the fig species, found in Bengal, Thailand, China, Ceylon, Burma and Malaysia.
The insect punctures the bark of the tree and sucks in the sap. Changes take place in the sap within the insect and it is exuded as a ruby coloured resin material which eventually encrusts the insect, As a result of the action of innumerable insects, the resinous material eventually covers the twigs to a thickness of up to 10mm and embeds the insect. When the life cycle of the insect is complete, the twigs are broken off to a length from 15 to 30cm. This is known as Stick Lac. The lac is removed from the sticks by grinding and scraping and appear as small seeds at this stage the material is called Seed Lac.
The seed lac is washed a number of times to free it from much of its colouring, twigs and other debris. After drying it is packed into cotton bags about 3″ or 7.5cm in diameter, but in varying lengths. The bags are held at each end and heated over a slow charcoal fire. The heat slowly melts the lac and the bag is twisted forcing the lac out through the weave of the cotton bag. The melted lac is scraped off the cotton and spread thinly over a porcelain drum to cool. The thin layer is then called Shellac.
When the drum is covered, the thin layer of shellac is removed, and while being held by its four corners is again softened by heating. As it slowly softens it is stretched until it becomes a very thin sheet. After removing any visible impurities the thin sheets are broken into the small flakes known generally as Orange Shellac.
Some of the lac first softened, is dropped in blobs onto a flat cooling surface to form cakes 50 to 70mm in diameter, and 2 to 3mm thick. These are known as Button Lac and are often impressed, while still soft, with the marker's name, and the grade of the product, e.g. “pure”. Poorer grades and the “offal” are frequently used for making cheap jewellery.
The chemical composition which varies from tree to tree is 65-70% lac resin, 3-5% lac wax, 4-6% gluten and 10-12% colouring matter. The presence of lac wax is considered to add to its mechanical strength and to lower its resistance to moisture.
Bleached lac – frequently used in wood finishing has had the colour removed by a chemical process. In the process it loses much of its elasticity.
Excessive heat applied to shellac degrades it, it becomes brittle on the surface of the job.
Shellac is soluble in methylated spirits and several other chemicals which I will not deal with in this article as they are not generally used in the polishing process.
Preparation of Shellac

Fig 2: Annointing rubber with oil. |
The polish is usually prepared by dissolving shellac in the proportions of 1kg of shellac in 4 litres of methylated spirit. Beginners might use a thinner mixture. If button lac is used it should be broken into small pieces before dissolving. Mixing is best done in a stone or glass container. Although a vessel with an airtight cover to prevent the evaporation of the solvent would be preferable it is rarely used in the trade because the polish adhering to the edge of the container would either bind the lid or prevent the user from sealing it after use.
Filtration
For those jobs requiring the highest grade finish, the polish is sometimes filtered to remove any trace of insoluble wax. This is done through a paper filter folded to fit inside a funnel. In the absence of filter paper, blotting paper may be used with the same result, although the process is somewhat tedious. Polish made from orange or flake shellac may not filter easily. In such a case, the wax may be separated from the polish by standing the container in a warm place. The heat causes the wax to settle, leaving a clear wax-free polish at the top.
The wax free polish, so obtained is referred to as "tops" or, (don't laugh) "tiddly", and is clear and free from the turbid effects of wax. Tops from orange or button shellac varies in colour from orange to iodine. The colour variations are caused from the basic differences in colour of the raw material itself. As with the coloured shellac, the tops from white shellac varies from cream to very pale amber.
Wax free polish produces a more brilliant finish as it does not cloud on the surface of the job, and is more resistant to the action of heat and water. If a synthetic lacquer is to be applied, a coating of tops, as a base coat, is often applied because of its freedom from wax.
Containers
Polish stored in a metal container will rapidly darken. The acidity of the shellac causes strong colour compounds to be formed with the metal. It is better stored in glass, and kept away from strong light and heat.
Moisture
You are aware that it is not advisable to have your car spray painted in damp weather. The reason is that the finish will bloom, because it absorbs moisture. The same thing happens with French Polish – the job will bloom. If the job is urgent, i.e. the customer will not survive if it is not finished today, a trial run with a dilution of 5% butyl cellusolve in the polish is sometimes successful. If bloom occurs and sets in the polish, it can be removed when the atmospheric conditions improve, by applying a rubber (this tool will be described later) charged with methylated spirits. The surface will be softened and the moisture released. A warm iron held at a safe distance from the surface has also been found to be successful, depending on how long after application the method is applied.
Polishing Rubbers
The most important tools of the French polisher are his polishing rubbers. A good craftsman zealously cares for his rubbers, and is as loath to lend them to another as a cabinet maker, who may well be the same craftsman, is to lend his favourite smoothing plane. In general practice, skilled craftsman have a variety of rubbers, each prepared for some particular phase of polishing and each stored in a separate jar, when not in use.
The making and wrapping of rubbers is part of the polisher's craft. The failure of beginners is usually due, to a material extent, to faulty rubbers.
Materials for Making Rubbers
The materials required for making a rubber are cotton wool, (we all know that), a piece of knitwear (very few of us knew that), and a square of open mesh material, such as dowlas (what the [deleted] is that?) – Webster says “A kind of course linen cloth much used in southern Scotland and Yorkshire in the eighteenth century.”, in other words, a piece of linen). Or a piece of forfar!!!
The cotton wool forms the core of the rubber after being needed into the accepted half pear shape. It requires a piece of cotton wool about 5″ or 12.5mm square, depending on the area to be polished. The cotton wool is more easily shaped if it has been charged with polish first, and for this reason, swooges make excellent rubbers. What are swooges? This will be dealt with in some detail later, but at this stage, it might be said to be a piece of cotton wool used to “mop on” a base coat of polish.
The knitwear is used to cover the cotton wool core, and to hold pumice powder when it is used in the rubber as an abrasive. At the preparatory stages of polishing, courser knit fabric is preferable. The piece of knitwear should be about as wide as the core and about twice as long to allow for wrapping and to prevent slipping. Care must be taken to ensure that the material does not extend beyond the point of the core when it is wrapped around it, or difficulty will be encountered in getting a good point to the rubber when it is finally covered with dowlas.
Incidentally, osnaberg is as good as dowlas or forfar if you do not have either of these, and it seems that linen is the best, and provides a good cover for the “skinning-in rubber”. The cover fabric does not need to be of the first quality, but the mesh must be open enough to allow the polish to flow through to the job. A closely woven fabric will quickly become congested. About an 8″ square of this material, washed free of dressing, is an appropriate size.
Making the Skinning-in Rubber
 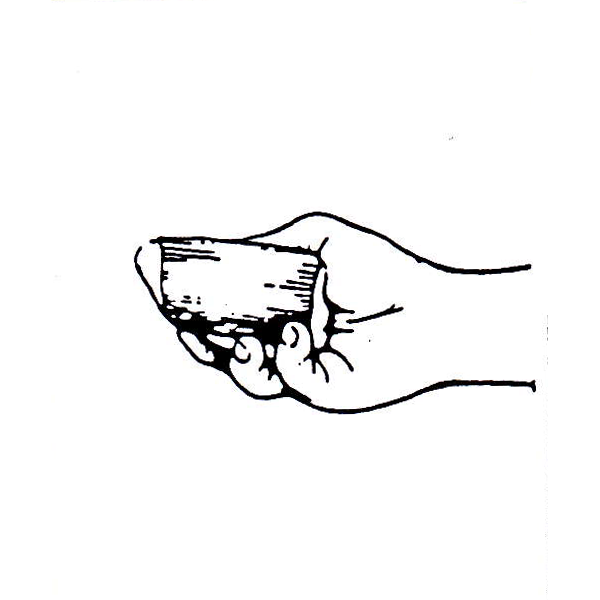 (i) |  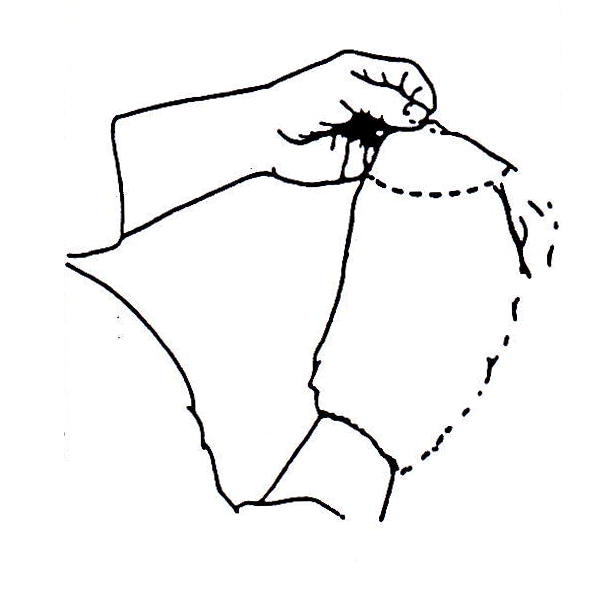 (ii) |  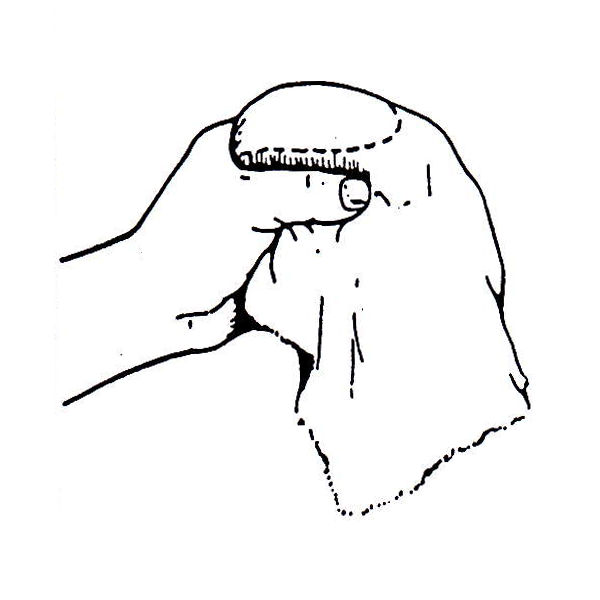 (iii) |
  (iv) |  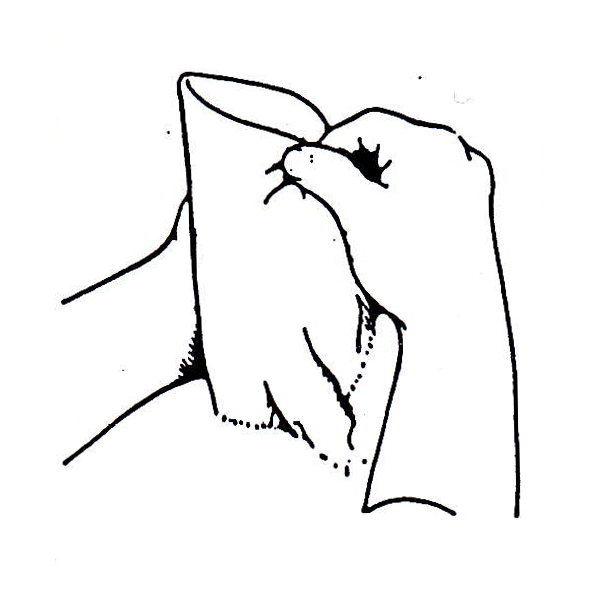 (v) |  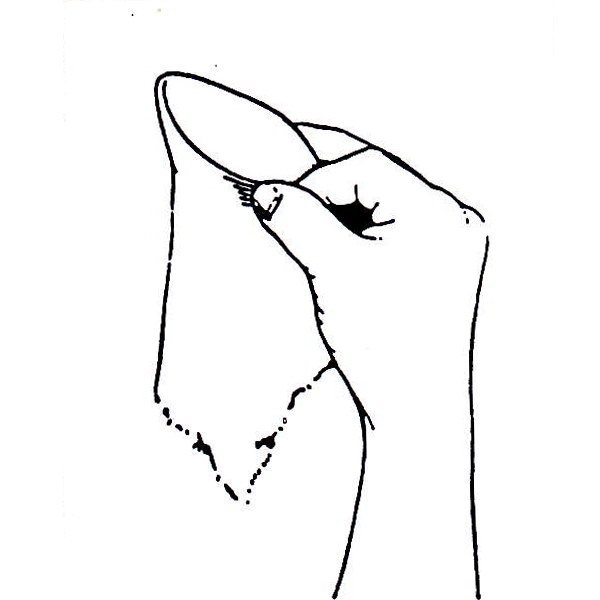 (vi) |
 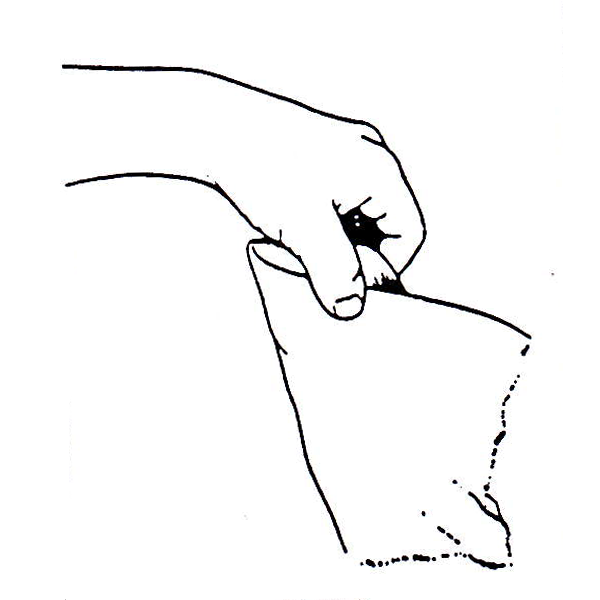 (vii) |   (viii) |  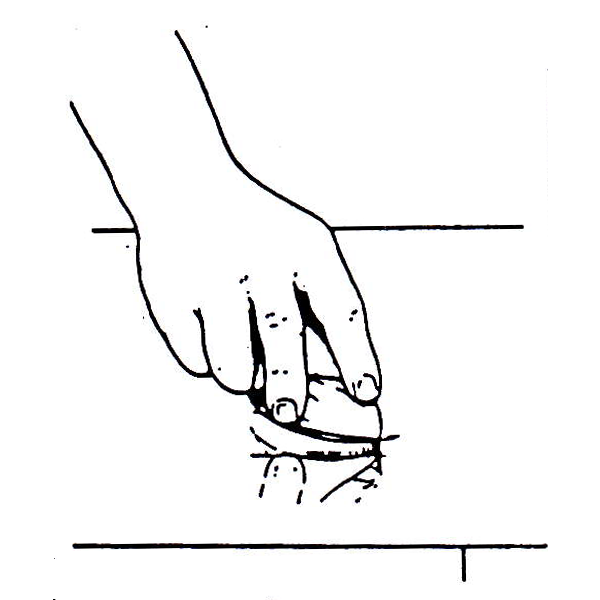 (ix) |
| Fig 3: Making a skinning rubber. | ||
The corners and edges of the cotton wool are folded towards the centre, care being taken to avoid lumpiness on what is to be the sole. The cotton wool is kneaded to form what is generally described as a half pear, split vertically. The piece of knitwear is placed under the cotton wool and brought up the sides as shown in figure 3.i. The linen is held at one corner, in the left hand, and the core, with the sole facing upwards and point facing the right, is placed behind the rag and diagonally across the corner, as shown in figure 3.ii.
The rag is released from the left hand and allowed to drape over the core. It is then eased down firmly and held in position as shown in figure 3.iii, with the left hand.
The toe of the rubber is shaped to a point with the right hand, per figure 3.iv and then the index finger of the right hand is placed against the rubber near its point and at right angles to the sole, pointing downwards. The rag is gathered with the remaining fingers of the right hand, as if to tie the index finger in the rag at the point of the rubber. As the rubber is rotated with the left hand, the index finger is slipped along the side of the rubber while the other fingers and thumb draw the rag into a fold – see figure 3.v. The point now faces left. The second and third fingers of the right hand are moved across the sole of the rubber to grip it firmly at the heel – see figure 3.vi, letting go with the left hand. The left hand is brought over the rubber to grip the sole and first fold of cover cloth as shown in figure 3.vii. The right hand is released. The loose ends of the rag are gathered up with the right hand and brought over the first fold – see figure 3.viii. The ends of the rag are then twisted and the rubber is ready for use, as shown in figure 3.ix.
The size of the rubber is often governed by the size of the surface to be polished, however, a small rubber on a very small surface invariably leads to trouble. Very small rubbers that require frequent charging should be used only in difficult corners. Generally a rubber should be as large as can comfortably be held and controlled.
When not in use, a rubber should be stored in an airtight glass jar. Occasionally a few drops of methylated spirits might be added to the jar to keep it moist
Wood Surface Preparation
The surfaces of woodwork direct from the cabinet maker are rarely in a condition for accepting the french polish without undergoing some further treatment. If the surface is not perfect, the finished job cannot be perfect.
Blemishes on the surface which may consist of machine marks, bruises, blisters, cross sanding marks, glue residue, dirt and grease marks, water marks and pencil marks, all need to be removed. Many of these can be removed with the common cabinet scraper. Dents may sometimes be lifted with a hot iron placed over a damp cloth, or a few drops of methylated spirit on the damaged section and ignited, this, if repeated frequently, though not enough to char the timber, can produce a satisfactory result.
Blisters, as the name suggests, are bubbles under a veneered surface. These may be removed by making a small- incision, with the grain and prising the slit open sufficiently to force some glue into it. A piece of plastic can then be placed on top of the bubble held down by a block of wood which is then cramped to flatten the glued surface. Any surplus hide glue may be sponged away later. Occasionally hot shellac is used to glue down a blister, but this is not recommended.
Blemishes which are too deep to remove must be stopped, i.e. filled. There are several preparations on the market which are suitable for the purpose. Early craftsmen invariably made their own filler from shellac, wax, water putty, lacquer putty or oil putty. Good results were achieved by stopping with hot shellac. The surplus was pared off with a chisel when the shellac had set. A common method today is to mix saw dust from a similar coloured timber with an adhesive such as plastibond, or even PVC glue.
The surface must then be fine sanded with paper no coarser than 240, but only with the grain, at all times. Always use a cork sanding block, to avoid producing an uneven surface. Edges should be sanded with a block no wider than the edge to be sanded. Note that it is essential that all scratches be removed or they will show in the finished job. The end grain must receive the same treatment. If it is left rough, it will absorb stain much more readily and have a tendency to be considerably darker than the surrounding timber. Steel wool may be used to smooth turned work which preferably will be done with the grain.
The job should be thoroughly dusted frequently during the sanding process. After sanding the french polisher may sponge the surface with a damp sponge. This raises the grain which is then sanded back when dry, for a smoother surface.
Staining
The next part of the process is staining. I will not dwell on this aspect very much, except to say, that the decision to apply stain is generally a matter of choice. There are numerous stains available on the market today which can be blended to produce the desired shade.
There are water stains, pigment oil stains, volatile oil stains bituminous oil stains, preservative oil stains, chemical stains and spirit stains. Remember not to rush the staining stage. Select a piece of the timber from which the object is made, if available, sand it to the same degree, and apply some stain and allow it to dry, as a test piece.
When the stain is dry, it should be fixed, by applying a half charged “soft” rubber to the surface. The soft rubber is a rubber of orthodox shape, made from previously well used cotton wool, and with a soft linen wrapping cover. Pumice is not used in the soft rubber, and although the use of a piece of knitwear over the rubber face is optional, it is recommended for the job in hand that knitwear should not be used.
Filling
This is an important part of the process, and one, the inexperienced person may regard as being unnecessary as it is rarely used in the mass production furniture industry today. I note that fillers are still available in some hardware stores. They are of a mud like consistency, made principally from whiting and come in several colours. The purpose is to fill the pores in the timber to produce a flat surface to receive the polish. Selection of the colour is as important as selecting the stain. While the use of a stain is optional, the use of a filler is not.
The filler is applied with a piece of open weave scrim or a piece of clean soft hessian, in a circular motion to force the filler into the pores. The filler is applied generously and the piece of hessian is changed frequently as it tends to clog. As soon as the shine goes off the surface of the filler, and before it dries, when it will be very difficult to remove, it is wiped off using a similar motion to its application, with clean hessian, finishing with a piece of softer material such as flannelette or cotton waste. As the filler is prepared with a chemical drier such as turps it should not raise the grain. If the surface is again sanded after the filler is applied, there is a risk that some filler will be removed from the surface. When the surface has been wiped clean, a small piece of timber shaped like a pencil, one end and a chisel the other is used to clean out corners and the like. Do not use a metal object especially a nail.
Allow the filler ample time to dry, usually overnight. The job is then ready for the finishing to commence.